Ruffwear
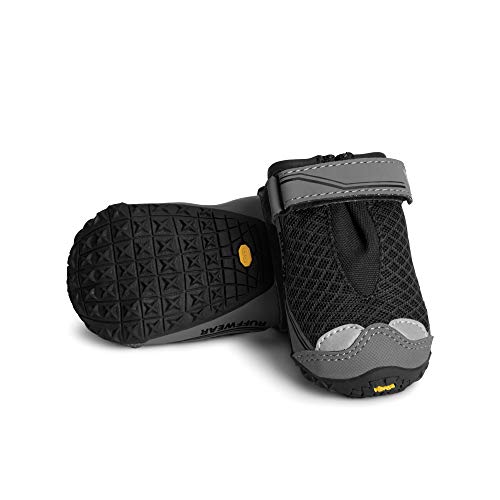
Ruffwear Grip Trex All-Terrain Dog Boots
Outdoor dog boots with Vibram outsoles for superior traction on any terrain. Protects paws from hot pavement and rough trails.
View on AmazonLast updated: 2026-04-10
How we researched this: we compared the manufacturer's specifications and label claims, published guidance and reported owner experience. We have not tested this product ourselves, and nothing here is veterinary advice. Editorial policy
Strengths
- Vibram outsoles
- All-terrain traction
- Protects from heat/cold
- Reflective trim
Drawbacks
- Sizing is critical
- Dogs resist at first
- Expensive set of 4
Ruffwear Grip Trex All-Terrain Dog Boots: In-Depth Research
Editorial analysis by the FurReviews team, based on manufacturer specifications, published guidance and reported owner experience. We have not tested this product ourselves.
When a dog actually needs boots
Boots are equipment for specific conditions, not everyday wear. The situations where they genuinely help:
A dog on grass and pavement in mild weather does not need boots, and forcing them on a dog that does not need them is the usual route to a dog that hates boots forever.
The Vibram outsole is the differentiator
Most dog boots have a moulded rubber or fabric sole. This one uses a Vibram outsole — the same lugged rubber used on hiking footwear — which is why it grips on wet rock, loose scree and hard-packed trail rather than skating.
The consequence is weight and stiffness. These are boots, not socks. On a dog used to bare feet the first walk is clumsy, and that is the boot working, not failing.
Sizing, which decides everything
This is where most dog-boot purchases go wrong, and the failure is invisible until the boot flies off on a trail.
Measure correctly:
Front and back paws are usually different sizes. Front paws are typically wider on most breeds. Measure all four. Buying two pairs in different sizes is normal and is the reason these are often sold in pairs rather than sets of four.
If the boot is loose enough to rotate on the paw, it will come off and it will also rub. If it is tight enough to splay the toes, the dog will refuse to walk.
Getting a dog to accept them
Rushing this is the single most common mistake. Work in short sessions over days, not one afternoon:
The high-stepping goose walk is normal and passes. A dog that lies down and refuses to move is telling you the fit is wrong or the introduction went too fast.
Fitting them so they stay on
Pull the boot on with the dew claw clear, seat the paw fully back into the toe, and tighten the closure above the widest part of the leg — that ridge is what the strap holds against. A strap tightened on the narrow part of the leg slides down and the boot comes off.
Check tightness by sliding a finger under the strap. Check again after ten minutes of walking, because boots settle.
Care and honest lifespan
Rinse them after salt or mud, air dry away from direct heat, and check the outsole for wear and the upper for grit. Grit trapped inside is the main cause of a boot rubbing a sore spot, so turn them out after rough ground.
They wear out. A dog doing serious mileage on rock will go through outsoles, and that is a consumable reality of any boot rather than a defect.
Who should look elsewhere
If you only need summer pavement protection for short walks, a paw wax or simply walking early and late costs nothing. If your dog has a wound or a bandage to keep dry, a disposable or rubber bootie is more appropriate and easier to clean. And if your dog has flatly refused every boot you have tried, do not force it — change the walk instead of the dog.
Ruffwear Grip Trex All-Terrain Dog Boots: Common Questions
How do I measure my dog for boots?
Stand the dog on paper with full weight on the paw, press the toes gently flat, and mark either side of the widest point. Measure that width — width is the sizing dimension, not length. Measure all four paws: front paws are usually wider than back, so two different sizes is common and normal.
Does my dog actually need boots?
Only in specific conditions: hot pavement, road salt and de-icer, ice and crusted snow, rough rocky trail, or protecting an injury or bandage. A dog walking on grass and pavement in mild weather does not need them, and putting boots on a dog that does not need them is how you get a dog that hates boots.
My dog walks strangely in boots. Is something wrong?
A high-stepping, exaggerated gait on the first few wears is normal and passes as the dog adjusts. A dog that lies down and refuses to move is different — that usually means the fit is wrong or the introduction was rushed. Go back to short indoor sessions with treats.
Why do the boots keep falling off?
Either the size is too large, or the strap is tightened on the narrow part of the leg. Seat the paw fully back into the toe of the boot and tighten the closure above the widest part of the leg, so the strap has a ridge to hold against. Re-check tightness after ten minutes of walking.
How hot is too hot for a dog's paws?
Use the back-of-the-hand test: press your hand flat on the pavement. If you cannot hold it there for seven seconds, it is too hot for paws. Walking early morning or late evening avoids the problem entirely and costs nothing.
Where to Buy
As an Amazon Associate, FurReviews earns from qualifying purchases at no extra cost to you.
Similar Products You Might Like

Outward Hound
Outward Hound Granby Splash Dog Life Jacket
Bright orange dog life jacket with dual rescue handles, reflective accents, and adjustable straps. Great for boating and swimming.
+ Dual rescue handles
+ Bright visibility
- Can chafe on some dogs
- Sizing runs large

Collapsible Travel
Large Collapsible Dog Bowls
Collapsible Travel dog accessories listed for comparison. We have not yet researched this product in depth — check the full specifications on the retailer's page.

Dog Boots
DcOaGt Dog Shoes for Large Dogs
Dog Boots dog accessories listed for comparison. We have not yet researched this product in depth — check the full specifications on the retailer's page.
